
How to Add Text to an Image or Photo via API (Step-by-Step)
 By APITemplate.io
Design the text layer once in a reusable template, then put any caption, quote or headline on an image with one API call, from cURL, Python, Node.js or a no-code tool such as Zapier or Make.com.
TL;DR:
What This Blog Covers:
How to put dynamic text on an image through an API (captions, quotes, headlines, names, prices) by designing the text layer once in a reusable template and then changing what it says with a JSON request from cURL, Python, Node.js or a no-code platform.
Key Points:
- Drawing text with an imaging library leaves font loading, line wrapping and positioning to your code; a template keeps all of that in a visual editor
- Every element in a template has a name, and that name is the key you override in the API request
- One request can change the text, its colour and its background, and swap the photo underneath it
- The editor’s API Console generates the JSON payload for your template and previews it for free
- The same template works from cURL, Python, Node.js, Zapier, Make.com, n8n, Airtable or a plain URL
- Each request returns hosted JPEG and PNG links, ready to post, email or store
Best For:
Developers adding captions or personalised text to images in an app, and marketers who want a steady supply of on-brand text graphics without opening a design tool for each one.
What “adding text to an image via API” means
You send an HTTP request containing some text. You get back an image with that text on it, set in the right font, at the right size, in the right place.
It is the engine behind a lot of everyday images:
- Quote cards and announcement graphics for social media
- Open Graph images that carry each article’s title into link previews
- Personalised images in email: a customer’s name on a voucher, a ticket or a certificate
- Product photos with the price or a “Sale” badge laid over them
- Captions on photos that users upload
Producing an image is the easy part. The text is where it gets hard: choosing a font that renders properly, breaking a long sentence into lines, and keeping it legible on whatever photo ends up behind it. How you handle that decides how much work the whole thing is.
Two ways to do it: draw the text in code, or fill in a template
The do-it-yourself route is an imaging library: Pillow in Python, ImageMagick on the command line, node-canvas or Sharp in Node.js. They are free and they work. But every typographic decision is yours to code: loading the font files, measuring each string, wrapping it into lines, centring it with pixel arithmetic, and shrinking it when the text runs long. Every design change after that, whether a new font, a moved logo or a different colour, is a code change and a deploy.
The template route splits the job in two. Someone designs the image once in a visual editor and names the parts that change. Your code then sends only the content, as JSON, and the rendering service does the typesetting. The design can be changed in the editor without touching the code that calls it, and the same template can be driven from a no-code tool by someone who never sees the code at all.
If all you need is one fixed watermark on images you are already processing, a library is the simpler choice. If the text changes from image to image, or more than one person cares how the result looks, a template is less work. The rest of this guide uses APITemplate.io’s image generation API, which is built around that model.
What you can control on a text layer
In an APITemplate.io template, text is an element on the canvas like any other, with its own properties panel on the right of the editor.
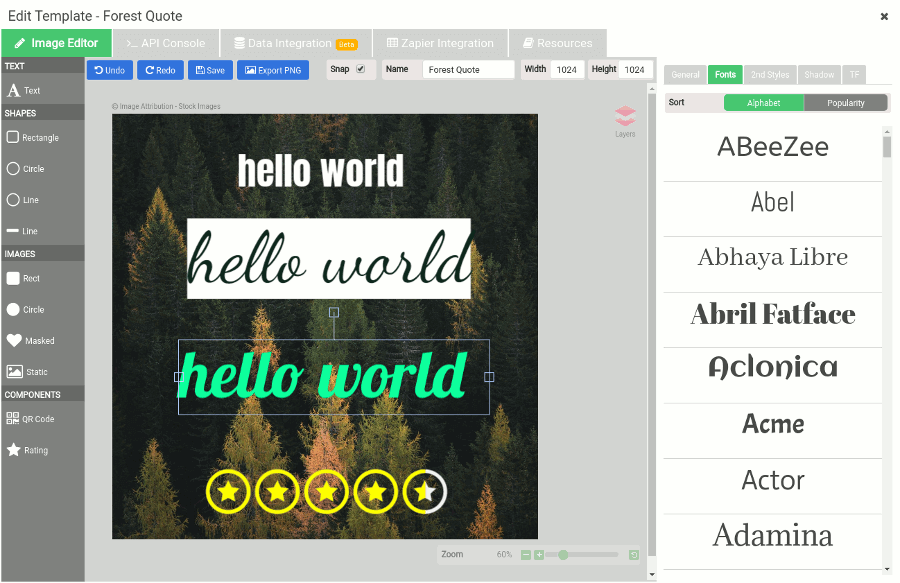
- Font. Pick from a library of hundreds of fonts in the Fonts tab, sorted alphabetically or by popularity.
- Colour and background colour. Set the text colour, plus a background colour behind the text itself. Made semi-transparent, the background keeps the words readable on any photo.
- Size and fit. Set a fixed font size, or tick Auto Fit with a Max Height for text that has to stay inside its box however long it gets.
- Weight, alignment, opacity and shadow. All on the same panel, with shadows in their own tab.
- Inline formatting. With Advanced Formatting ticked, markup inside the text styles part of it:
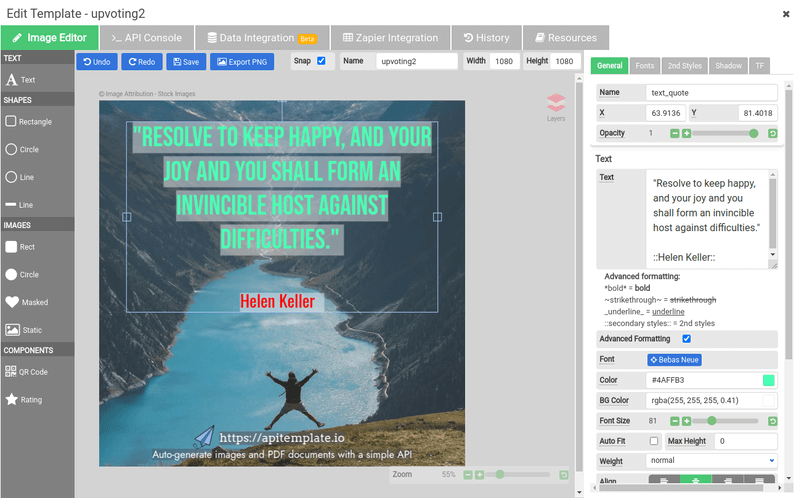
*bold*,_underline_,~strikethrough~, and::secondary styles::, which applies whatever look you set in the 2nd Styles tab. That is how the image at the top of this article sets “Helen Keller” in red inside the same element as the quote. Because the markup lives in the text itself, it works the same in the text you send through the API.
What you will need
- An APITemplate.io account. The free plan includes 50 images a month, which is plenty to build a template and test it. See pricing for the paid tiers.
- Your API key, for the code examples. It is under API Integration in the dashboard’s left menu.
- One of:
curl, Python 3 with therequestspackage, or Node.js 18 or later. Or none of them, if you take the no-code route.
Step-by-step: build a reusable text template
Step 1: Sign up or log in
Go to app.apitemplate.io and register, or log in if you already have an account.
Step 2: Open Manage Templates
In the dashboard, choose Manage Templates from the menu on the left. Every template you build lives here.
Step 3: Create a new template
Click New Template, give it a name, choose Image as the output type, pick a starting design and click Create. One of the Instagram quote presets is a good starting point for this tutorial, because it already has a text element over a photo.
Step 4: Launch the Image Editor
Back in the template list, click Launch Image Editor on the template you just created.
Step 5: Style the text, then name it
Click the text element on the canvas (or add one with Text at the top of the left toolbar), type some sample copy and style it.
Then give it a name. The Name field at the top of the General tab is what the API uses to find this element. Call the quote text_quote and the attribution text_author.
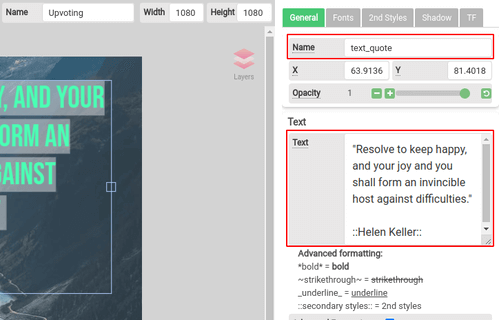
Name every element that will change, and name it after what it holds. text_headline, text_price and image_background tell the next person exactly what to send; text_1 and rect_1_1_1 make them open the editor to find out. Click Save when you are done.
Step 6: Generate the JSON in the API Console
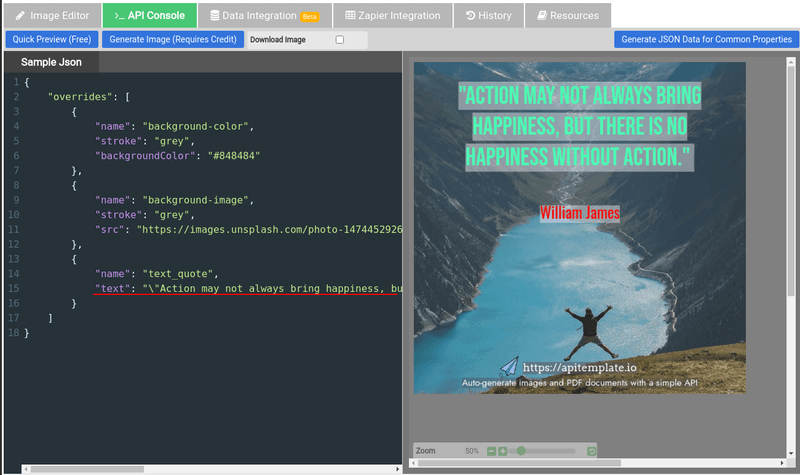
Open the API Console tab. If the Sample Json pane is empty, click Generate JSON Data for Common Properties.
The result is a list of overrides, one object per element. Each object names an element and lists the properties you can change on it. Edit the text of text_quote and you are editing what the image will say.
Step 7: Preview it
Click Quick Preview (Free) to render the JSON in the preview pane without using a credit. Now is the moment to paste in the longest text you expect to send: an overflow is much cheaper to find here than in production. Generate Image (Requires Credit) produces the real, hosted file.
Step 8: Copy the template ID
Back in Manage Templates, copy the template’s ID. With your API key, it is everything the API needs to know.
Add text to an image with cURL
The quickest way to test is a single request from the terminal. Send the overrides to the create-image endpoint, with your template ID in the query string and your API key in the X-API-KEY header:
curl -X POST "https://rest.apitemplate.io/v2/create-image?template_id=YOUR_TEMPLATE_ID" \
  -H "X-API-KEY: YOUR_API_KEY" \
  -H "Content-Type: application/json" \
  -d '{
    "overrides": [
      {
        "name": "text_quote",
        "text": "\"Happiness is not an ideal of reason, but of imagination.\"",
        "color": "#0DFC9C",
        "textBackgroundColor": "rgba(217, 217, 217, 0.33)"
      },
      {
        "name": "text_author",
        "text": "Immanuel Kant"
      }
    ]
}'The request changes three things on text_quote (its text, its colour and its background colour) and only the text on text_author. Anything you leave out keeps the value it has in the template.
The response links to the finished image:
{
  "status": "success",
  "download_url": "https://bucket.s3.amazonaws.com/91f62769-69e4-48bf.jpeg",
  "download_url_png": "https://bucket.s3.amazonaws.com/91f62769-69e4-48bf.png",
  "template_id": "YOUR_TEMPLATE_ID",
  "transaction_ref": "a0430897-2c94-40e1-a09b-57403d811ceb"
}download_url is the JPEG and download_url_png is the PNG. If you only need one, add output_image_type=jpegOnly or output_image_type=pngOnly to the query string.
One practical note: the payload sits inside single quotes, so text containing an apostrophe will break the command. For anything beyond a quick test, save the JSON to a file and send it with -d @payload.json.
Add text to an image with Python
In Python, wrap the request in a function and the template becomes a one-line call:
import os
import requests

API_KEY = os.environ["APITEMPLATE_API_KEY"]
TEMPLATE_ID = "YOUR_TEMPLATE_ID"


def add_text(quote, author):
    response = requests.post(
        "https://rest.apitemplate.io/v2/create-image",
        params={"template_id": TEMPLATE_ID},
        headers={"X-API-KEY": API_KEY},
        json={
            "overrides": [
                {"name": "text_quote", "text": f"\"{quote}\""},
                {"name": "text_author", "text": author},
            ]
        },
        timeout=60,
    )
    response.raise_for_status()
    result = response.json()
    if result.get("status") != "success":
        raise RuntimeError(result)
    return result["download_url_png"]


print(add_text("Happiness is not an ideal of reason, but of imagination.", "Immanuel Kant"))requests builds the JSON for you, so the quotes and apostrophes that trip up a shell command need no special handling here.
From there, a batch is a loop. With a quotes.csv that has quote and author columns:
import csv

with open("quotes.csv", newline="", encoding="utf-8") as f:
    for row in csv.DictReader(f):
print(add_text(row["quote"], row["author"]))Every row becomes an image, each in the same font, layout and colours, without anyone opening the editor again.
Add text to an image with Node.js
The same request with the fetch built into Node.js 18 and later. Save it as add-text.mjs so top-level await works:
const API_KEY = process.env.APITEMPLATE_API_KEY;
const TEMPLATE_ID = 'YOUR_TEMPLATE_ID';

const response = await fetch(
  `https://rest.apitemplate.io/v2/create-image?template_id=${TEMPLATE_ID}`,
  {
    method: 'POST',
    headers: {
      'X-API-KEY': API_KEY,
      'Content-Type': 'application/json',
    },
    body: JSON.stringify({
      overrides: [
        {
          name: 'text_quote',
          text: '"Action may not always bring happiness, but there is no happiness without action."',
        },
        { name: 'text_author', text: 'William James' },
      ],
    }),
  },
);

const result = await response.json();
if (result.status !== 'success') throw new Error(JSON.stringify(result));
console.log(result.download_url_png);Any other language that can send an HTTPS request works the same way. The API reference has samples for PHP, C# and more, and there are client libraries for Python, C#, Java, PHP and JavaScript.
Swap the photo as well as the text
Image elements are overridden the same way, by sending a new src. The API Console screenshot above shows it: the preset’s background-image element sits in the payload right next to text_quote.
{
  "overrides": [
    {
      "name": "background-image",
      "src": "https://example.com/photos/mountain-lake.jpg"
    },
    {
      "name": "text_quote",
      "text": "\"Resolve to keep happy, and your joy and you shall form an invincible host against difficulties.\""
    }
  ]
}Now one template captions any photo you point it at: a user’s upload, a product shot, the hero image of a blog post. When the photo can be anything, give the text a semi-transparent textBackgroundColor (or put a panel behind it in the template) so it stays readable on light and dark images alike.
Add text to images without writing code
The template does not care what calls it. If you would rather not write code, the same overrides can come from:
- Zapier. A trigger (a new spreadsheet row, a form response, a new product) supplies the text, and the APITemplate.io Create Image action renders it. Follow our step-by-step Zapier guide.
- Make.com. Better for scheduled batches and branching logic. See scheduling and automating social content generation and automating stock chart infographics.
- Airtable. Keep the text in a base and generate an image per record, as in our Airtable guide.
- Google Sheets. A spreadsheet as the queue: automate image generation with Zapier and Google Sheets.
- n8n. Self-hosted or cloud workflows. Our n8n guide shows the setup with PDFs, and images work the same way.
- Bubble.io. Generate images from a Bubble app with the APITemplate.io plugin.
- A plain URL. Direct URL turns the overrides into query-string parameters written as
element.property, sotext_quote.text=Hellochanges the quote. It needs no API key, the result is cached until the parameters or the template change, and it can go straight into an<img>tag. Our guide to Open Graph images with Direct URL walks through it.
Tips for text that stays readable
- Design for the longest text, not the typical one. If a headline can be 120 characters, preview it at 120. Turn on Auto Fit, or let the layout grow with the text: our guide to responsive templates using auto-position shows how to make other elements move with it.
- Never trust the photo for contrast. Text that reads well on one image vanishes on the next. A text background or a panel behind the copy removes the gamble.
- Give each piece of text its own element. A separate
text_authorcan have its own size, colour and position, and can change without anyone touching the quote. - Escape double quotes in JSON. Quote marks inside a JSON string are written as
\", as in the examples above. Libraries such asrequestsandJSON.stringifydo it for you; hand-written payloads do not. - Choose fonts that cover your languages. If the text can include accented letters or non-Latin scripts, check the font has those glyphs before you ship.
- Preview before you automate. The API Console’s quick preview is free. Run your worst-case text through it before wiring up a workflow that will generate hundreds of images.
Ideas to build on
Once a template takes text from an API, the same pattern covers a lot of ground:
- Image quotes from reusable templates, a full walkthrough of the quote format used here
- Ad banners in every display size from a single row of data
- Personalised images in Mailchimp campaigns, with each subscriber’s details in the picture
- Social images from a Shopify product list
- Job posting images for LinkedIn
- Turning tweets into social media images
FAQ
Can I add text to my own photo instead of a template background?
Yes. Override the src of the template’s image element with the URL of your photo, in the same request as the text. The template then works as a caption layout for any image you send it.
Which text properties can I change through the API?
Any property listed for that element when you click Generate JSON Data for Common Properties in the API Console. For text, the ones you will use most are text, color and textBackgroundColor. Everything you do not send keeps the value set in the template.
Do I need to know how to code?
No. The editor is visual, and Zapier, Make.com, Airtable, n8n and Bubble.io all connect without code. Direct URL needs nothing more than a link.
What format is the image returned in?
By default both: the response carries a JPEG link in download_url and a PNG link in download_url_png. Set output_image_type to jpegOnly or pngOnly to get just one.
How many images can I generate for free?
The free plan includes 50 images a month and needs no credit card. Previews in the API Console are free and do not count. Paid plans raise the monthly quota; see pricing for the details.
Conclusion
Putting text on an image is simple once. Doing it well a thousand times, in the right font, wrapped properly and readable on every background, is a typesetting problem, and it does not belong in your application code. Design the text layer once in a template, name the parts that change, and from then on every new image is a few lines of JSON, whether they come from cURL, Python, Node.js or a Zap.
Sign up and add text to your first image, free with no credit card required. For more on what the API can do, see the image generation API and social media image automation.
Other Blog Articles

5 Easy Steps to Automate Image Generation API – FREE with Zapier, Google sheets, and APITemplate.io
In this tutorial, we are going to automate the process of image generation with Zapier, Google sheets and APITemplate.io to create custom product images based on a predefined template and a product listing.

How to Automate Job Posting Images for LinkedIn
In this tutorial, we will walk you through the process of automating job posting images on LinkedIn with Zapier, Airtable, and APITemplate.io

How to automatically generate social media images from your Shopify product list
In this blog post, we will be guiding you how to automate the image generation process to generate the perfect product photos for your products with just a couple of clicks.