How to Create Online Ad Banners with APITemplate.io's Banner Builder (Step-by-Step)
 By APITemplate.io
Design a display ad banner once in APITemplate.io's banner builder, then generate every size, headline and offer variation from data — by hand, or automatically with Zapier, Make.com or the REST API.
TL;DR:
What This Blog Covers:
How to build a display ad banner once in APITemplate.io’s banner builder and then produce every size, headline and offer variation from data, first by hand and then automatically.
Key Points:
- A banner campaign is a grid of sizes × variations; a template turns the design work into a one-time job
- The four ad-banner presets are the 728×90 leaderboard, 300×600 half page, 300×250 medium rectangle and 336×280 large rectangle
- The same editor has presets for Instagram, Facebook, LinkedIn, X and Pinterest, so social placements come from the same workflow
- Name the elements that change; those names become the fields you automate
- Small banners punish long copy: one headline, one offer, one call to action
- One template can be driven from Zapier, Make.com, Airtable, Google Sheets, n8n or your own code
Best For:
Performance marketers, agencies and e-commerce teams who run display or social ad campaigns and spend more time resizing banners than deciding what they should say.
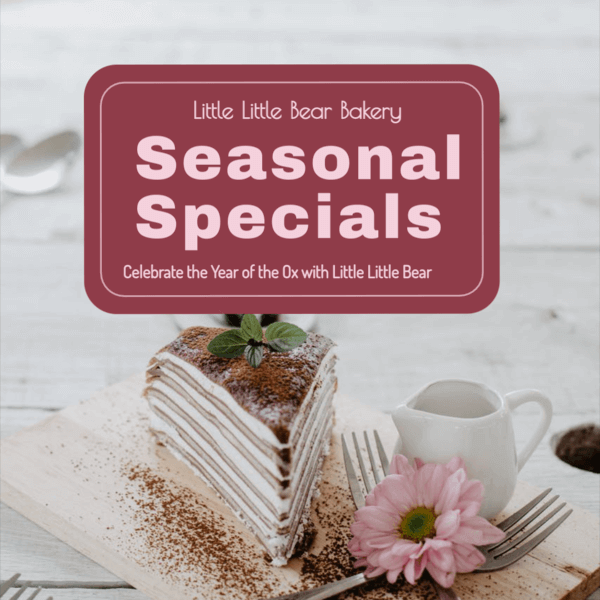
What is an online ad banner?
A banner ad is a rectangular image placed on a web page (above the header, in the sidebar or between paragraphs) that links to a landing page. Its job is narrow: catch the eye of someone who came to read something else, and earn the click.
Banners come in two broad shapes. Horizontal banners, called leaderboards, run across the top or bottom of a page. Vertical banners, called skyscrapers, and their wider cousin the half page sit in the sidebar. Between the two are the rectangles, which fit inside the content itself and carry much of the inventory on display networks.
For the wider tour of banner types, placements and dimensions, read our in-depth guide to banner generation. This article is the hands-on part: actually building them.
Why ad banners are worth templating
One banner is easy. A campaign is not.
Take a modest one: four display sizes, plus square and landscape versions for social. Three headlines to A/B test. Two offers. That is 6 × 3 × 2 = 36 images, before anyone asks for a version in a second language, or the sale ends and every one of them needs a new date.
In a design tool, each of those is a separate file that someone opens, edits, exports and uploads. The effort grows with every image, which is why campaigns ship with fewer variations than they should and why testing is the first thing to go when the deadline gets close.
A template changes the arithmetic. You design each size once and mark which parts change: the headline, the offer, the product photo. From then on, a new variation is a row of data rather than a design job. APITemplate.io’s banner builder is a visual editor for making those templates, with an image generation API behind it that renders them on demand.
The banner sizes to design for
The editor’s ad-banner presets cover four of the most widely used display sizes:
| Size | Name | Where it usually runs |
|---|---|---|
| 728×90 | Leaderboard | Above the header or below an article |
| 300×600 | Half page | In the sidebar, where its height makes it hard to miss |
| 300×250 | Medium rectangle | Inside content and in sidebars; the most flexible size |
| 336×280 | Large rectangle | Inside or at the end of article content |
Alongside those, there are presets for social placements: Instagram, Facebook, LinkedIn, X and Pinterest posts and ads. The same campaign can run on social without a separate design pass.
Need a size that has no preset, such as a 320×50 mobile banner? Set the canvas Width and Height in the editor’s toolbar and design to that instead.
What you will need
- An APITemplate.io account. The free plan includes 50 images a month, which is plenty to build and test a full set of banners. See pricing for the paid tiers.
- Your brand assets. Logo, colours, fonts, and a product or campaign photo.
- The copy for one variation, plus the longest headline you expect to run. You will want to test with it.
No design software, and no code unless you choose the API route at the end.
Step-by-step: build your banner template
Step 1: Sign up or log in
Go to app.apitemplate.io and register, or log in if you already have an account.
Step 2: Open Manage Templates
In the dashboard, choose Manage Templates from the menu on the left. Every template you build lives here.
Step 3: Create a new template from a preset
Click New Template. In the dialog that opens:
- Give the template a name, and put the size in it (
Seasonal Specials 300x250, say). You will be glad you did once there are a dozen of them - Choose Image as the output type
- Pick a category on the left, either an ad size such as Medium banner (300×250) or Large rectangle (336×280), or a social preset like Instagram, then choose a starting design on the right
- Click Create
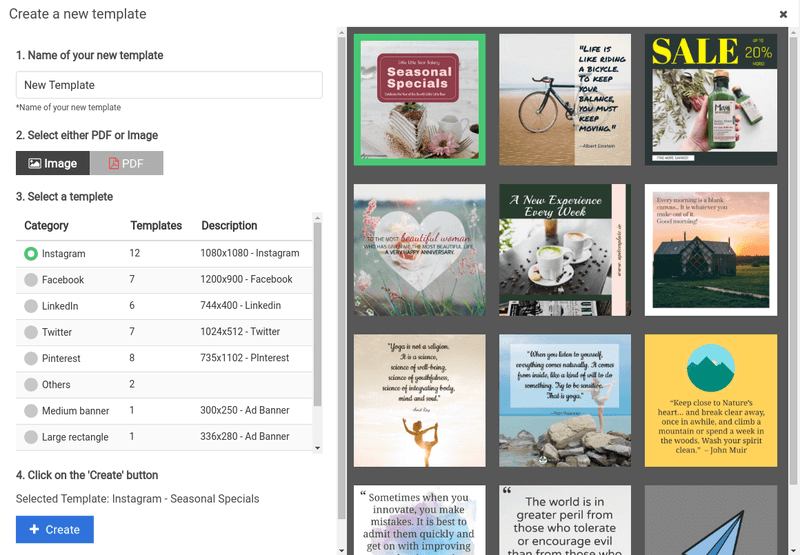
The preset sets the canvas to the exact dimensions the placement expects, so there is nothing to resize later.
Step 4: Launch the Image Editor
Back in the template list, click Launch Image Editor on the template you just created.
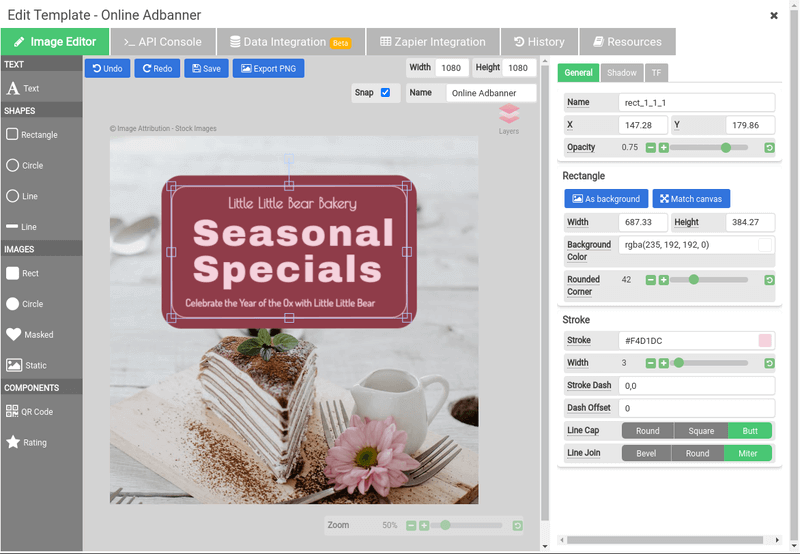
The editor is a drag-and-drop canvas. Text, shapes, images, QR codes and ratings are on the left; the banner is in the middle; and the selected element’s properties (position, size, colour, opacity, corner radius, stroke) are on the right.
Step 5: Make it yours, and name what will change
Replace the preset’s text, photo and colours with your own. In the example above, the copy sits on a rounded rectangle at 75% opacity. The panel keeps the headline readable whatever photo ends up underneath it, which is worth copying for any banner whose background will change.
Then rename the elements that will vary from one banner to the next. Every element has a Name field: call the headline text_headline, the offer text_offer, the call to action text_cta and the photo image_product. Those names are the keys you will use in every automation afterwards. A template with meaningful names is one anyone on your team can automate; one full of defaults like rect_1_1_1 is a puzzle.
Click Save.
Step 6: Generate your first variations
The template is now a small banner factory. Change the text of text_headline and you have a new banner; swap the image behind image_product and you have another.
There are three ways to do it:
- In the editor. Edit the text and click Export PNG. Fine for a one-off.
- In the API Console tab. The editor generates a JSON payload listing every property you can override. Change the values and preview the result. That JSON is exactly what an automation platform or your own code will send later.
- Through an integration. Covered below, and where the real time savings are.
Step 7: Repeat for each size
Build one template per size, and reuse the same element names in each. A leaderboard and a half page need different layouts, but if both call their headline text_headline, a single row of data can fill every size in the campaign at once.
Design tips for banners that get clicked
- Write for the smallest size first. A 728×90 leaderboard is 90 pixels tall. If the headline does not fit there, it is too long for the campaign, not just for that banner.
- One message, one offer, one call to action. Banners are glanced at, not read.
- Make the call to action its own element. A separate
text_ctalets you test “Shop now” against “See the menu” without touching anything else. - Protect contrast. Photos change, and text that is legible on one disappears on the next. A solid or semi-transparent panel behind the copy, as in the example, removes the gamble.
- Design for your longest copy. Test with the worst real headline you have. Our guide to responsive templates using auto-position covers layouts that adapt to text length.
- Keep the logo in the same place on every size. Recognition builds across placements only if the brand mark does not move.
- Mind the file-size limits. Ad networks cap image ads (Google Ads, for example, at 150KB), so compress photos and favour flat colour on the smallest sizes.
From one banner to hundreds: automating generation
Everything so far is manual, just faster. The step change comes when the data stops being typed in and starts arriving from a spreadsheet, a product feed or a campaign brief.
Pick the route that matches how you already work:
- Zapier. A trigger (a new spreadsheet row, a form response, a product added to your store) supplies the copy, and the APITemplate.io Create Image action renders the banner. Follow our step-by-step Zapier guide, or the Instagram image generation tutorial in the docs.
- Make.com. Better for scheduled batches and branching, such as sending one record to every size template with a router. See scheduling and automating social content generation and automating stock chart infographics.
- Airtable. Keep the campaign’s variations in a base and generate a banner per row. Our Airtable guide walks through it.
- Google Sheets. The same idea with a spreadsheet as the queue: automate image generation with Zapier and Google Sheets.
- n8n. APITemplate.io works in self-hosted or cloud n8n workflows. Our n8n guide shows the setup with PDFs, and images work the same way.
- The REST API. Call the image generation API from your own code: one request per banner, carrying the template ID and your overrides. The API reference documents the payload.
- A direct URL. Generate an image from a query string, with no automation platform at all.
In every case, the template you built is the thing being called. Adding a channel does not mean redesigning anything.
Where the finished banners go
Each generated banner comes back as a hosted image URL, so the same workflow can carry on and:
- Upload it to your ad platform, or drop it in the shared folder your media buyer works from
- Put it in an email, with SendGrid or as a personalised image in a Mailchimp campaign
- Post it to your social channels, or queue it in Buffer
- Send it to Slack for approval before it goes live
- Archive it to Google Drive or your own storage
FAQ
What size should an online ad banner be?
Start with the 300×250 medium rectangle and the 728×90 leaderboard: between them they fit most placements on most sites. Add the 300×600 half page and 336×280 large rectangle when you want more inventory, and a mobile size such as 320×50 if a lot of your traffic is on phones. Our banner generation guide lists the full set of standard and social dimensions.
Can I generate every banner size from the same data?
Yes. Build one template per size and give the elements that change the same names in each. One record (headline, offer, image) can then be sent to every template in the same workflow, and you get the whole set back together.
Do I need to know how to code?
No. The editor is visual, and Zapier, Make.com, Airtable and n8n all connect without code. The REST API is there if you would rather call it from your own application.
How many banners can I generate for free?
The free plan includes 50 images a month and needs no credit card. Paid plans raise the monthly quota; see pricing for the details.
Conclusion
A banner campaign is mostly repetition: the same design at four sizes, three headlines, two offers, re-dated for every sale. That repetition is the part worth handing to software. Build the template once per size, name the parts that change, and every variation after that is data.
Sign up and start automating your banners, free with no credit card required. For more ideas, see banner generation use cases and social media image automation.
Other Blog Articles
5 Easy Steps to Automate Image Generation API – FREE with Zapier, Google sheets, and APITemplate.io
In this tutorial, we are going to automate the process of image generation with Zapier, Google sheets and APITemplate.io to create custom product images based on a predefined template and a product listing.
Why Marketing Automation Is Important to You and Its Benefits
APITemplate's image generation API helps you design and automate social images or banners. You can create variants of images based on image templates to keep your branding consistent across all your social media profiles.
How to Automate Job Posting Images for LinkedIn
In this tutorial, we will walk you through the process of automating job posting images on LinkedIn with Zapier, Airtable, and APITemplate.io